The Peperomia Caperata isn’t your ordinary houseplant. With its charmingly wrinkled leaves and easygoing personality, it’s a superstar for busy plant lovers. Unlike finicky fiddle leaf figs or thirsty orchids, this little wonder thrives on neglect.
Jump to a section:
Peperomia Caperata Background Information

Peperomia caperata, often referred to as the Emerald Ripple Peperomia, is part of the Piperaceae family, known for its wide range of stunning foliage varieties.
Native to the tropical rainforests of Brazil where it grows as an epiphyte on trees, this house plant thrives in humid environments and shaded areas. This makes it an ideal choice for indoor gardening.
Peperomia caperata made it to the horticultural world in the early 20th century and has since become a popular houseplant.
Features and Characteristics
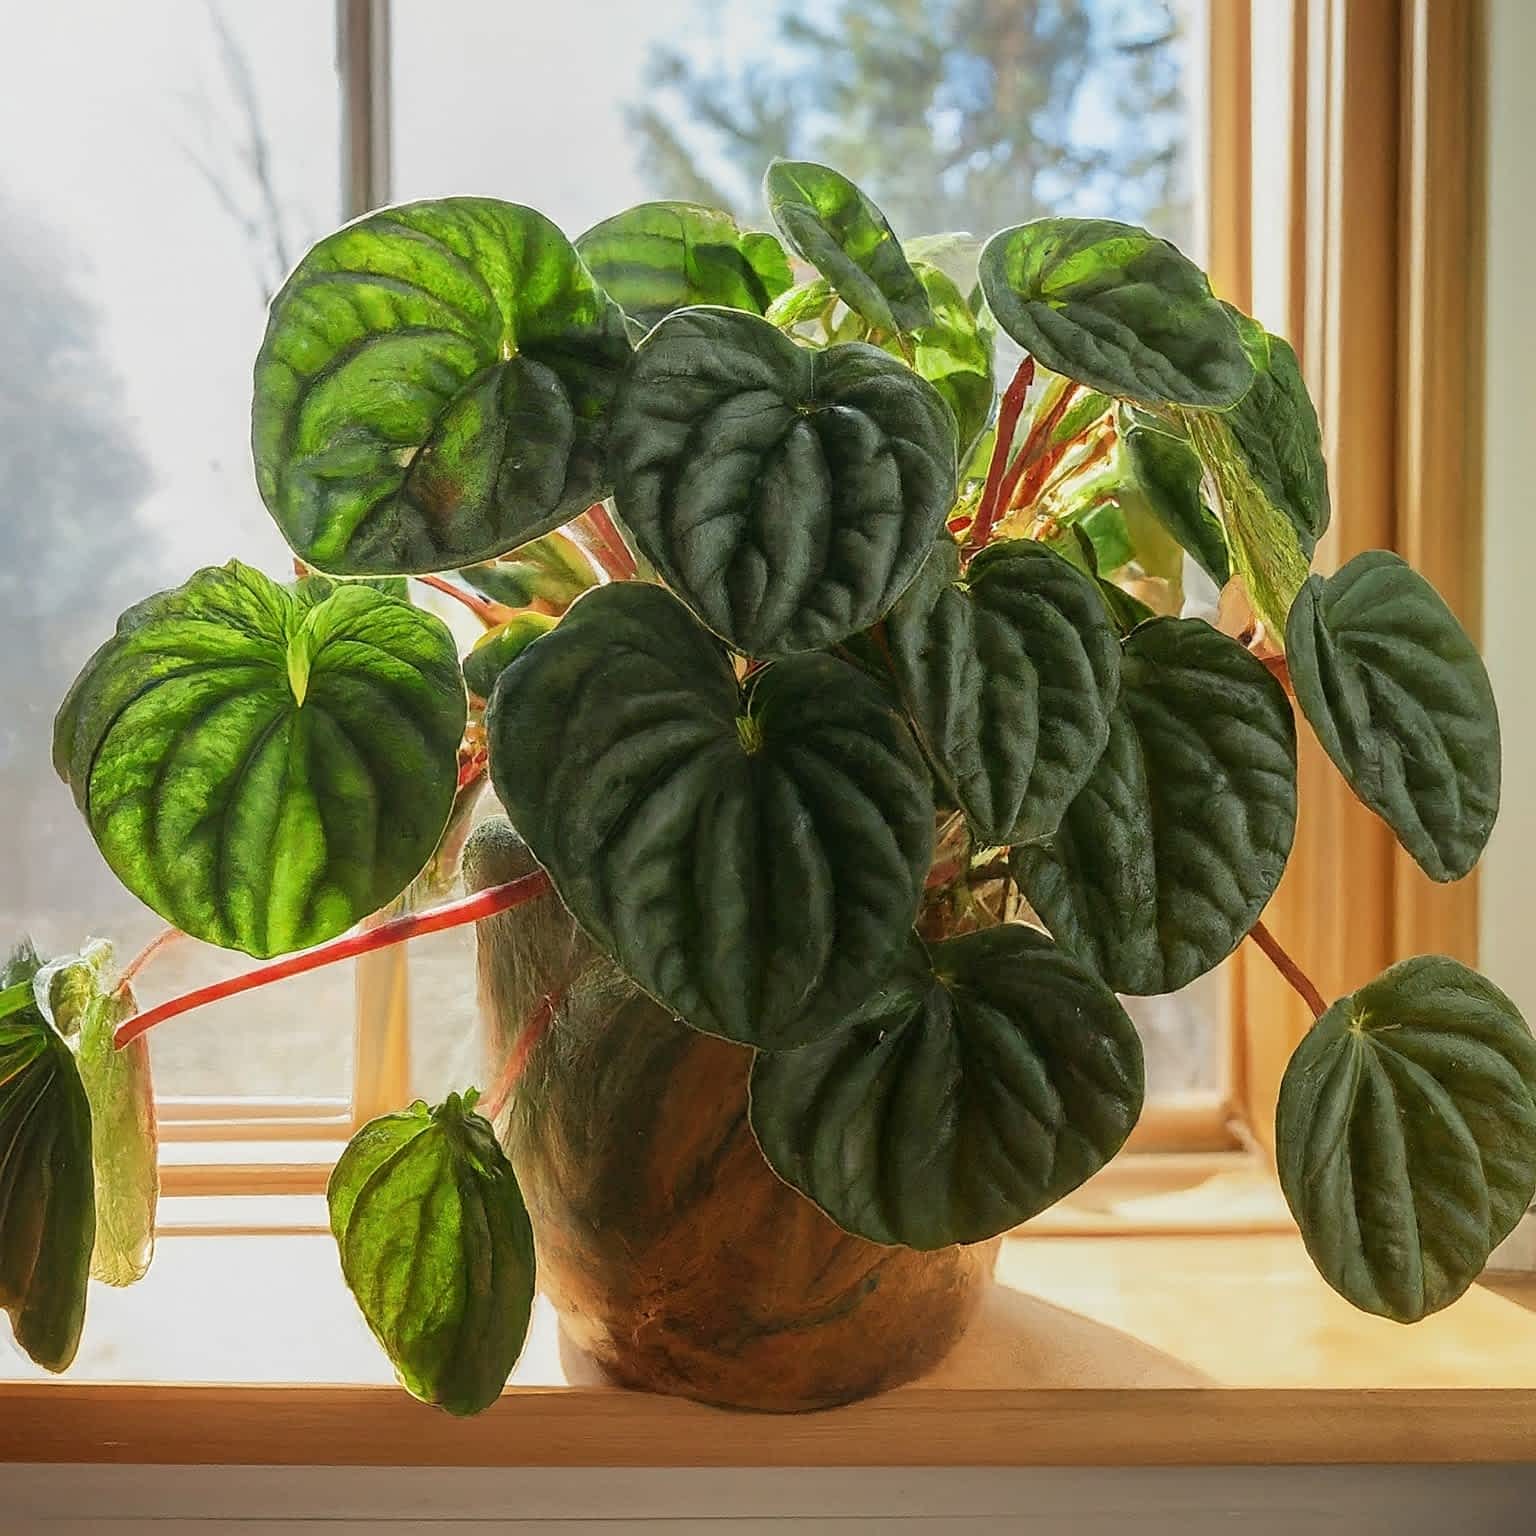
- Leaves: Heart-shaped, deeply corrugated, and velvety texture.
- Color: Dark green with a hint of red or purple undertones.
- Size: Typically grows up to 8 inches tall.
- Growth Habit: Compact, bushy, and low-growing.
- Flowers: Small, spike-like inflorescences that are not particularly showy but add to its charm.
Facts Table
| Feature | Description |
| Botanical Name | Peperomia caperata |
| Common Names | Emerald Ripple Peperomia |
| Family | Piperaceae |
| Origin | Brazil |
| Light Requirement | Low to moderate indirect light |
| Watering Needs | Moderate, allow soil to dry slightly |
| Soil Type | Well-draining, peat-based mix |
| Humidity | Prefers higher humidity levels |
| Temperature | 60-80°F (16-27°C) |
| Growth Rate | Slow to moderate |
| Toxicity | Non-toxic to pets |
How to Grow Peperomia Caperata
Growing Peperomia caperata is a rewarding and enjoyable process. With the right steps, you can ensure your plant thrives and adds beauty to your indoor space.
Here’s a detailed guide to growing Peperomia caperata, from sourcing a healthy plant to planting it and everything in between.
1. Sourcing a Healthy Peperomia Caperata
When starting your journey with Peperomia caperata, the first and most crucial step is to source a healthy plant.
Here’s how to ensure you get a strong start:
- Reputable Source: Purchase your plant from a reputable nursery or garden center. This increases the chances of getting a healthy specimen. Plus, it reduces the risk of bringing pests or diseases into your home.
- Inspect the Leaves: Look for vibrant, firm leaves without any signs of yellowing, browning, or spots. The leaves should be free of any holes or damage.
- Check the Soil: The soil should be well-draining and not overly wet. Avoid plants that are sitting in soggy soil, as this can indicate poor care or potential root rot.
- Root Health: If possible, gently check the roots. Look for roots that are bright white or light brown in color. These roots should feel firm to the touch, not soft or mushy. Avoid any plants with roots that appear dark or discolored, as this can indicate rot.
2. Choosing the Right Pot
Selecting the appropriate pot for your Peperomia caperata is essential for its growth and overall health.
Here’s what to consider:
- Size: A pot that’s just a bit bigger than the root ball is ideal. This allows for proper drainage and prevents the soil from staying too wet for too long.
- Material: Terracotta pots are excellent choices as they allow for better airflow and help prevent overwatering. Plastic pots can also work well but ensure they have ample drainage.
- Drainage: Your Peperomia Caperata needs a pot with drainage holes at the bottom. Good drainage is crucial to prevent water from accumulating in the soil, which can lead to root rot.
3. Preparing the Soil
Using the right soil mix is vital for the health of your Peperomia caperata. This plant prefers well-draining soil that mimics its natural epiphytic environment.
A peat-based potting mix with added perlite or orchid bark is ideal, as it provides the necessary aeration and prevents waterlogging. This type of soil mimics the plant’s natural epiphytic environment, allowing the roots to breathe while retaining enough moisture for the plant’s needs.
Here’s how to create the ideal soil mix for your Peperomia caperata:
- In a large container, mix equal parts of peat moss and perlite. If you prefer, you can also add some orchid bark or coarse sand to further improve drainage.
- The ideal soil pH level for Peperomia caperata is slightly acidic to neutral, around 6.0 to 7.0. Most commercial peat-based mixes fall within this range.
If you prefer a pre-made mix, look for one labeled for African violets or epiphytic plants, as these typically offer the right composition for Peperomia caperata.
4. Planting
Planting your Peperomia caperata correctly sets the stage for healthy growth.
Follow these steps for successful planting:
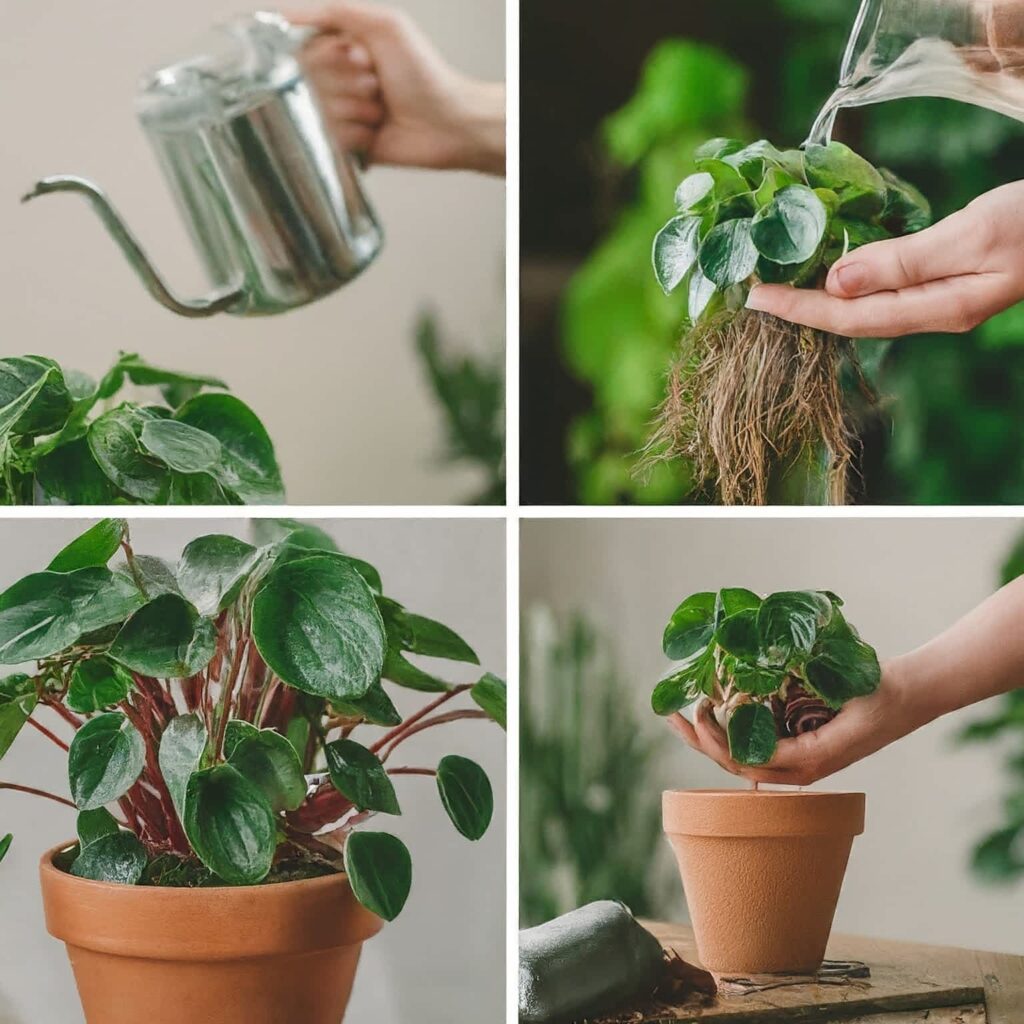
- Remove from Nursery Pot: Gently take the plant out of its nursery pot. If the plant is root-bound, loosen the roots slightly to encourage new growth.
- Add Soil: Place a layer of the prepared soil mix at the bottom of the new pot.
- Position the Plant: Position the plant in the center of the pot, ensuring it sits at the same depth as it was in the nursery pot. Fill in around the root ball with more soil, pressing lightly to eliminate air pockets.
- Watering: Once you’ve planted your Peperomia Caperata, give it a good drink of water. This helps settle the soil around the roots, ensuring good contact and promoting healthy growth. Allow excess water to drain out completely.
Peperomia Caperata Care
Caring for Peperomia caperata is straightforward. Here’s a quick overview of how to care for this houseplant:
- Provide low to moderate indirect light.
- Water moderately, allowing the top inch or so of soil to dry out before watering again.
- Maintain temperatures between 60-80°F (16-27°C).
- Use a well-draining, peat-based soil mix.
- Fertilize monthly during the growing season.
- Repot every 2-3 years or when root-bound.
- Prune to maintain shape and remove dead leaves.
- Protect from frost and cold drafts.
Caring for Peperomia caperata involves understanding its needs and providing an environment that mimics its natural habitat.
Here’s an in-depth look at how to care for your Peperomia caperata to ensure it thrives.
Light
Peperomia caperata thrives in low to moderate indirect light. It’s essential to find a balance, as too much direct sunlight can scorch the delicate leaves, causing them to become crispy and discolored.
It is a good idea to place your plant near a north or east-facing window where it can receive gentle, filtered light.
If you notice the leaves turning yellow or the plant becoming leggy, it might be a sign that it’s not getting enough light. In such cases, consider moving it to a brighter spot with indirect light.
For places that lack adequate natural light, you may want to use artificial lighting as the Peperomia caperata adapts well to this type of lighting. Fluorescent lights are an excellent choice for offices and dimly lit rooms.
Temperature and Humidity
Temperature and humidity play a crucial role in the health of your Peperomia caperata. This plant prefers a warm, stable environment with temperatures ranging between 60-80°F (16-27°C).
Avoid exposing it to cold drafts, sudden temperature fluctuations, or proximity to heating vents and air conditioners, as these can stress the plant and lead to damage.
Humidity is another vital factor, as Peperomia caperata originates from tropical rainforests where the air is naturally humid. To replicate this environment, aim for a humidity level of around 50-60%.
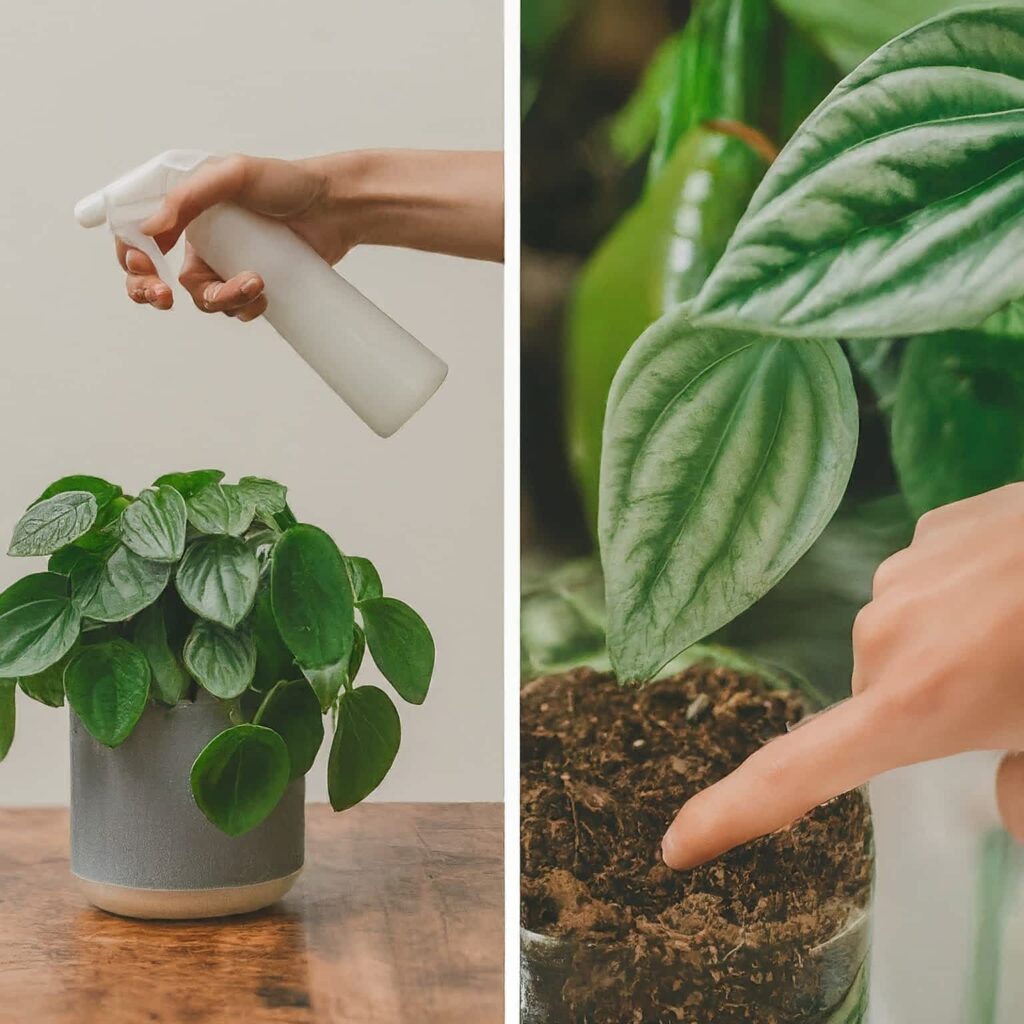
If you live in a dry climate or use indoor heating, consider placing a humidifier nearby, regularly misting the plant with water, or using a humidity tray filled with water and pebbles. These measures help maintain the moisture level in the air, preventing the leaves from drying out and ensuring the plant remains lush and healthy.
Water
The plant prefers moderate watering, with the soil allowed to dry out slightly between waterings. This generally means watering every 1-2 weeks, depending on your indoor climate and the season.
To water your plant, thoroughly soak the soil until water drains out of the bottom of the pot, ensuring the entire root system is hydrated. Use water that’s around room temperature. Sudden changes in temperature can stress the plant’s roots.
After watering, make sure to empty any excess water from the saucer to prevent the roots from sitting in stagnant water, which can lead to root rot.
It’s better to underwater than overwater, as Peperomia caperata is more tolerant of dry conditions than waterlogged soil.
Feeding/Fertilizing
During the growing season, typically from spring to early autumn, feed your plant once a month with a balanced, water-soluble fertilizer diluted to half strength. This provides a steady supply of nutrients without overwhelming the plant.
Be careful not to over-fertilize, as this can cause salt buildup in the soil and potentially harm the plant. During the fall and winter months, reduce or stop fertilizing altogether, as the plant’s growth slows down and its nutrient requirements decrease.
Always follow the manufacturer’s instructions on the fertilizer packaging to avoid overfeeding.
RELATED POST: How to Make Nitrogen Fertilizer at Home
Repotting
Repotting Peperomia caperata every 2-3 years is essential to refresh the soil and provide space for new growth. Spring is the ideal time for repotting, as the plant is actively growing and can adjust to its new pot more easily.
In doing so, choose a pot that is one size larger than the current one, and ensure it has adequate drainage holes. Carefully take out the plant from its old pot while ensuring not to damage the roots. If the plant is root-bound, carefully tease the roots apart to encourage new growth.
Then, place a layer of fresh potting mix at the bottom of the new pot, position the plant in the center, and fill in around the root ball with more soil. Press the soil lightly to eliminate air pockets, and water thoroughly to help the plant settle into its new home.
Deadheading
While the Peperomia caperata flower is not particularly showy, it’s a good idea to remove spent blooms to keep the plant looking tidy and healthy.
Deadheading involves snipping off the flower spikes as they fade, which helps the plant focus its energy on producing more foliage rather than seed production.
Use clean, sharp scissors or pruning shears to make a clean cut just above the base of the flower spike. Regular deadheading not only improves the plant’s appearance but also encourages new growth and prevents the plant from becoming leggy.
Pruning
Pruning is an essential part of Peperomia caperata care to maintain its shape and promote bushier growth.
Regularly inspect your plant and remove any dead, damaged, or yellowing leaves with clean, sharp scissors. This prevents the spread of diseases and keeps the plant looking its best.
If your Peperomia caperata becomes leggy or overgrown, trim back the stems to encourage new growth and maintain a compact, attractive shape.
Pruning can be done at any time of the year, but it’s best to do it during the active growing season for faster recovery and regrowth.
Winter Care
In winter, Peperomia caperata requires some adjustments to its care routine.
Since the plant’s growth slows down, reduce watering and allow the soil to dry out more between waterings. Ensure the indoor temperature remains above 60°F (16°C) and avoid placing the plant near cold drafts or heating vents. Indoor heating can dry out the air, so it’s essential to maintain humidity levels.
Use a humidifier, mist the plant regularly, or place it on a humidity tray to prevent the leaves from drying out. Reducing feeding during this period is also crucial, as the plant’s nutrient requirements are lower in winter.
Pest and Disease Control
Peperomia caperata is relatively pest-resistant, but it can occasionally fall victim to common houseplant pests. Here’s how to manage them:
Common Pests
- Spider Mites: Spider mites cause yellowing and leaf speckles. Increase humidity to deter them or consider treating spider mite infestations with insecticidal soap or neem oil.
- Mealybugs: These appear as white, cotton-like masses on the leaves and stems. You can get rid of mealybugs using a cotton swab dipped in rubbing alcohol. Another option is to use insecticidal soap. Explore more DIY pest control strategies.
- Fungus Gnats: These small flies thrive in moist soil. Allow the soil to dry out between waterings and use sticky traps to catch the adults.
Common Diseases
- Root Rot: This is mostly caused by overwatering and poor drainage. Choose a pot with holes and water only when the soil feels dry to the touch.
- Leaf Spot: Fungal or bacterial spots on the leaves. Prune away sick leaves and give your plant some breathing room.
How to Manage the Common Problems With Peperomia Caperata
Brown Leaves
Brown leaves can result from underwatering, low humidity, or too much direct sunlight. Adjust your watering routine, increase humidity, and move the plant to a shadier spot.
Yellow Leaves
Yellow leaves are often a sign of overwatering. To avoid overwatering, check the top inch of soil – if it’s moist, hold off on watering.
Other Problems
- Leggy Growth: This could be a sign your Peperomia Caperata is light-starved. Move it to a brighter location with indirect light.
- Wilting: Wilting can be caused by underwatering or overwatering. You can inspect the moisture level by sticking your finger into the soil. If the top inch is dry, it’s watering time.
How to Propagate Peperomia Caperata
Propagation is a fun and rewarding way to multiply your Peperomia caperata collection. Here’s how to do it:
Option 1: Stem Cuttings
- Choose a healthy stem with at least one leaf growing from a node (the little bump on the stem).
- Use a clean, sharp knife or scissors to snip the stem cleanly just below this node.
- Remove the lower leaves, leaving only a couple of leaves at the top.
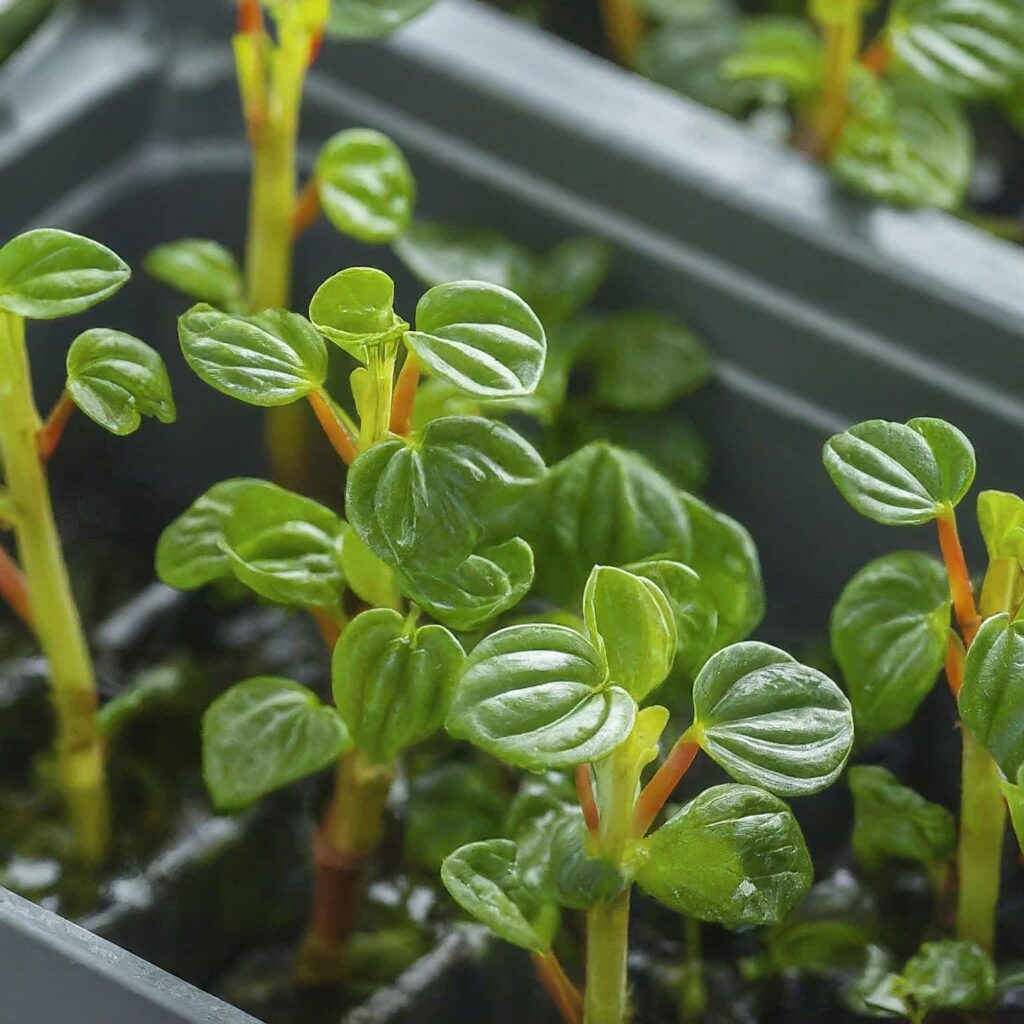
- Place the cutting in a small pot filled with a well-draining potting mix. Water lightly.
- While not essential, covering the pot with a clear plastic bag or placing it in a propagation chamber can boost humidity. Remember, some airflow is crucial to prevent mold. Keep the pot in bright, indirect light.
- After a few weeks, roots should start forming. Gently tug on the stem – if you feel resistance, it’s rooted and ready for its own pot!
- Once the cutting has a healthy root system, transplant it into a slightly larger pot with regular potting mix. Continue caring for it as you would a mature Peperomia caperata.
Option 2: Leaf Cuttings
- Select a mature, healthy leaf from your Peperomia caperata.
- Using a clean, sharp knife, cut the leaf with a small piece of stem attached.
- Allow the cut end to callous over for a few hours to prevent rot.
- Insert the cut end of the leaf into a small pot filled with well-draining potting mix. Water lightly.
- For a propagation boost, enclose the pot with a clear plastic bag or place it in a propagation chamber. Remember, a little ventilation is key to prevent mold growth.
- Find the perfect spot – bright, indirect light is ideal.
- Once the new plantlet has developed roots and leaves, transplant it into a slightly larger pot with regular potting mix.
Peperomia Caperata Varieties
There are several types of Peperomia caperata to choose from, each with its own unique characteristics.
Here are a few popular varieties:
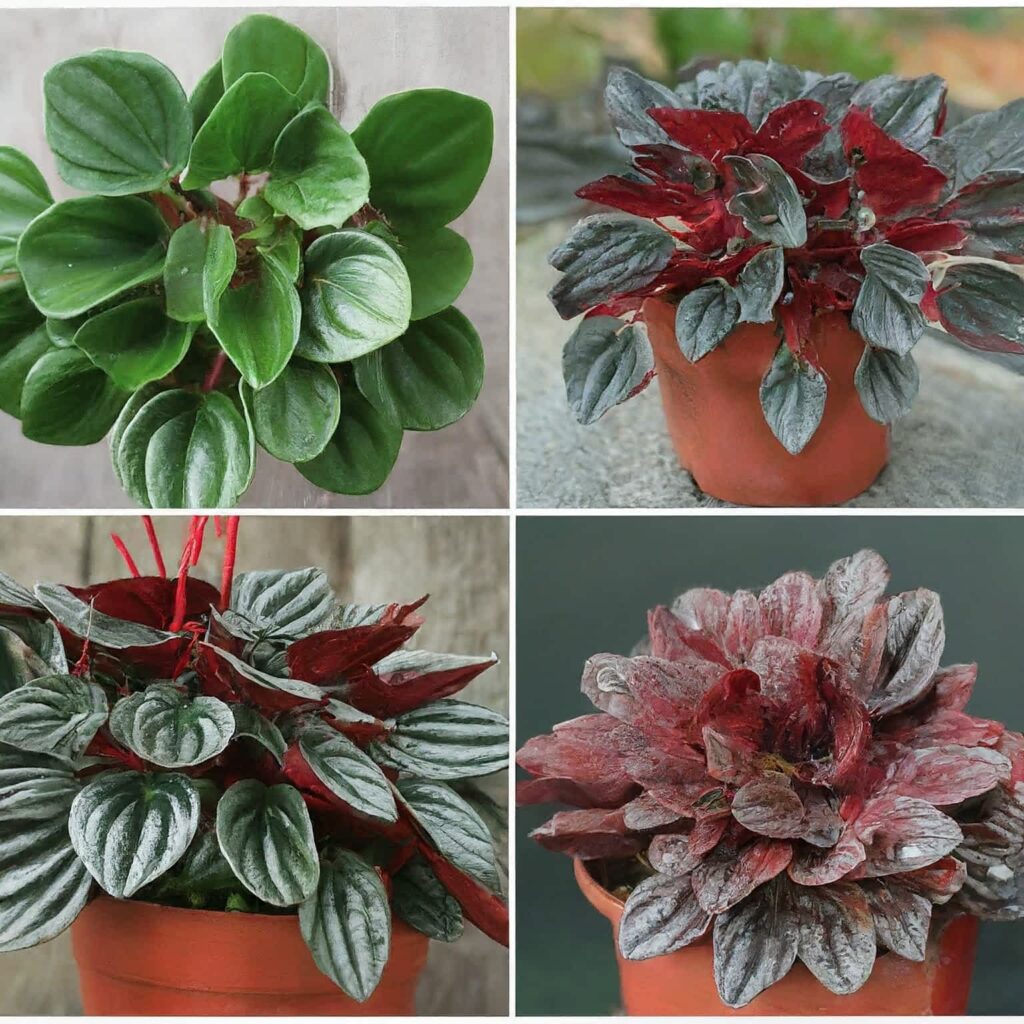
- Peperomia caperata Rosso: Known for its striking red undersides and green topsides, Peperomia caperata Rosso adds a vibrant touch to any collection.
- Peperomia caperata Emerald Ripple: Featuring deep green, heavily textured leaves, this variety is the classic form of Peperomia caperata.
- Peperomia caperata Luna Red: Boasts deep red leaves with a beautiful, crinkled texture, perfect for adding a pop of color.
- Peperomia caperata Frost: This variety has silvery, frosted leaves that create a stunning contrast in your indoor garden.
Conclusion
Growing and caring for Peperomia caperata is a delightful experience for any plant lover, especially beginners. With its attractive foliage and low-maintenance needs, this plant is sure to bring joy and greenery to your home.
Follow the steps outlined in this guide and you’ll be well on your way to becoming a successful Peperomia caperata grower. Remember to enjoy the process and take pride in your green thumb!
FAQs
Are peperomia hard to keep alive?
No, Peperomia caperata is quite easy to care for. With the right light, water, and humidity, this plant can thrive and bring joy to your indoor garden.
Is peperomia plant lucky?
While not traditionally considered a “lucky” plant, this plant is believed to bring positive energy and a sense of well-being to your home.
Does peperomia need sunlight?
Peperomia caperata needs bright, indirect light. Direct sunlight can scorch its leaves, so a spot with filtered light is ideal.
How do you keep peperomia happy?
Keep your Peperomia caperata happy by providing it with moderate watering, bright indirect light, and a humid environment. Regularly check for pests and keep the plant in a stable, warm temperature range.
Should I mist peperomia caperata regularly?
Yes, misting Peperomia caperata can help maintain the humidity it loves, especially in dry indoor environments. However, ensure the leaves dry quickly to prevent fungal issues.
Shall I water a peperomia caperata from the top or bottom?
You can water Peperomia caperata from the top, but make sure the soil dries out slightly between waterings. Bottom watering is also effective and helps prevent overwatering.